[av_one_full first min_height=” vertical_alignment=” space=” custom_margin=” margin=’0px’ padding=’0px’ border=” border_color=” radius=’0px’ background_color=” src=” background_position=’top left’ background_repeat=’no-repeat’ animation=” mobile_display=”]
[av_heading heading=’Training Your Core: More Than Just Abs’ tag=’h3′ style=” size=” subheading_active=” subheading_size=’15’ padding=’10’ color=” custom_font=”][/av_heading]
[av_textblock size=” font_color=” color=”]
By: Jewel Kessler, CPT, Fitness Director
[/av_textblock]
[/av_one_full][av_one_full first min_height=” vertical_alignment=” space=” custom_margin=” margin=’0px’ padding=’0px’ border=” border_color=” radius=’0px’ background_color=” src=” background_position=’top left’ background_repeat=’no-repeat’ animation=” mobile_display=”]
[av_textblock size=” font_color=” color=”]
The main objective of core training is to strengthen the deep and superficial muscles that stabilize, align, and move the trunk muscles, primarily the abdominal and back muscles. Core training is used for many different reasons such as to strengthen or prevent low back discomfort, improve posture, improve efficiency of movement, and enhance athletic performance. Consistent core training helps with functional efficiency, neuromuscular (coordination) gains, stability, muscular endurance, strength, and power.
The core comprises of the lumbo-pelvic-hip-complex (LHPC), including the lumbar spine, pelvic girdle, abdomen, hip joint. The core is where the center of gravity is and where all movement originates. Essentially, a strong core is the entire basis for human movement and functionality which is why it is such a focal point in fitness.
[/av_textblock]
[av_textblock size=” font_color=” color=”]
Let’s look at the core from a personal trainer’s perspective, dissect it, and discuss how it can be improved with proper exercises.
The core is made of three systems: the local stabilization system, the global stabilization system, and movement system. The local stabilization system is muscles attached to the vertebrae such as the transversus abdominis, internal obliques, lumbar multifidus, pelvic floor muscles, and diaphragm. These muscles provide support from vertebrae to vertebrae, assist with posture, and aid in proprioception. They limit excessive compression, shearing and rotational forces between spinal segments. They create pressure within the abdominal cavity and tension within the connective tissue of the low back to provide stiffness or support for improved core control and stability.
[/av_textblock]
[av_textblock size=” font_color=” color=”]
The global stabilization system attach from the pelvis to the spine such as quadratus lumborum, psoas major, external obliques, portions of the internal obliques, rectus abdominis, gluteus medius, and adductor complex. The global stabilization system transfers loads between the upper and lower extremities, provide stability of the spine and pelvis, provide total body stability and responsible for efficiency of functional movement.
[/av_textblock]
[av_textblock size=” font_color=” color=”]
The movement system is muscles that attach the spine and pelvis to the extremities such as the latissimus dorsi, hip flexors, hamstring complex, and quadriceps. When all three systems work together they create neuromuscular control and stability. However, that’s not always the case because many people just want to jump into the most difficult core exercise without establishing a proper base or foundation to core stabilization. Simply put, one must be able to stabilize before they can move efficiently in order to add strengthening exercises.
Injury prevention is a huge benefit to core stabilization and strength training. According to the National Academy of Sports Medicine, “client and athletes with lower extremity pain, long-standing adductor (inner thigh) pain, hamstring strain, iliotibial band syndrome (runner’s knee) and LBP {lower back pain} have a decrease chance of injury, less recurrence of injury, and improved performance measures after undergoing active rehabilitation program aimed at improving strength and neuromuscular control of the core (LPHC) muscles.” (1)
[/av_textblock]
[av_textblock size=” font_color=” color=”]
See below for four core exercises to practice at home or the gym. Add these exercises into your current routine or fit in a quick 15 minute core workout. Make sure you perform these exercises on a mat or carpeted floor.
[/av_textblock]
[av_hr class=’default’ height=’50’ shadow=’no-shadow’ position=’center’ custom_border=’av-border-thin’ custom_width=’50px’ custom_border_color=” custom_margin_top=’30px’ custom_margin_bottom=’30px’ icon_select=’yes’ custom_icon_color=” icon=’ue808′]
[/av_one_full][av_one_half first min_height=” vertical_alignment=” space=” custom_margin=” margin=’0px’ padding=’0px’ border=” border_color=” radius=’0px’ background_color=” src=” background_position=’top left’ background_repeat=’no-repeat’ animation=” mobile_display=”]
[av_textblock size=” font_color=” color=”]
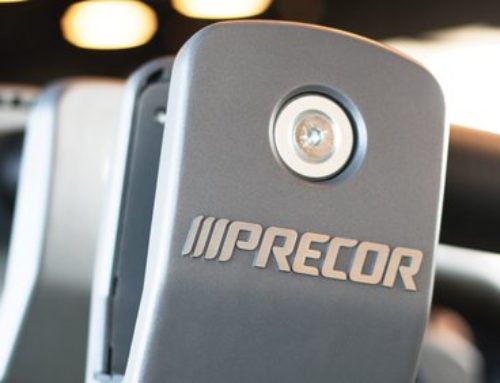
| Two-Leg Floor Bridge
Preparation: Lie supine on the floor with knees bent, feet flat on floor, and toes shoulders-width apart and pointing straight ahead. Movement: 1. Contract your gluteus muscles and lift pelvis off the floor until the knees, hips, and shoulders are in line. 2. Slowly lower pelvis to floor. 3. Repeat as instructed. Avoid hyperextending the low back. Repetitions 12 – 20 Sets: 1 to 4 |
[/av_textblock]
[/av_one_half][av_one_half min_height=” vertical_alignment=” space=” custom_margin=” margin=’0px’ padding=’0px’ border=” border_color=” radius=’0px’ background_color=” src=” background_position=’top left’ background_repeat=’no-repeat’ animation=” mobile_display=”]
[av_image src=’https://horshamathletic.com/wp-content/uploads/2016/10/jewel1.jpg’ attachment=’4681′ attachment_size=’full’ align=’center’ styling=” hover=” link=” target=” caption=” font_size=” appearance=” overlay_opacity=’0.4′ overlay_color=’#000000′ overlay_text_color=’#ffffff’ animation=’no-animation’][/av_image]
[/av_one_half][av_one_half first min_height=” vertical_alignment=” space=” custom_margin=” margin=’0px’ padding=’0px’ border=” border_color=” radius=’0px’ background_color=” src=” background_position=’top left’ background_repeat=’no-repeat’ animation=” mobile_display=”]
[av_image src=’https://horshamathletic.com/wp-content/uploads/2016/10/Jewel2.jpg’ attachment=’4682′ attachment_size=’full’ align=’center’ styling=” hover=” link=” target=” caption=” font_size=” appearance=” overlay_opacity=’0.4′ overlay_color=’#000000′ overlay_text_color=’#ffffff’ animation=’no-animation’][/av_image]
[/av_one_half][av_one_half min_height=” vertical_alignment=” space=” custom_margin=” margin=’0px’ padding=’0px’ border=” border_color=” radius=’0px’ background_color=” src=” background_position=’top left’ background_repeat=’no-repeat’ animation=” mobile_display=”]
[av_textblock size=” font_color=” color=”]
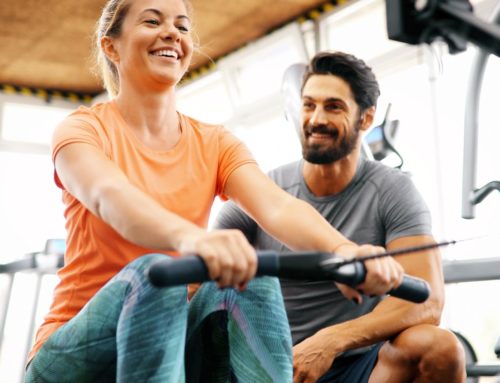
| Floor Prone Cobra
Preparation: Lie prone on the floor. Movement: 1. Activate gluteal muscles, and pinch shoulder blades together. 2. Lift chest off the floor with thumbs pointed up and arms externally rotated as illustrated. 3. Hold for 1 to 2 seconds. 4. Slowly return body to the ground, keeping chin tucked. 5. Repeat as instructed. Repetitions 12 – 20 Sets: 1 to 4 |
[/av_textblock]
[/av_one_half][av_one_half first min_height=” vertical_alignment=” space=” custom_margin=” margin=’0px’ padding=’0px’ border=” border_color=” radius=’0px’ background_color=” src=” background_position=’top left’ background_repeat=’no-repeat’ animation=” mobile_display=”]
[av_textblock size=” font_color=” color=”]
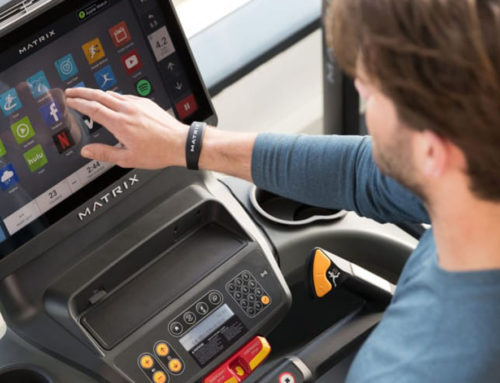
| Ball Crunch
Preparation: Lie supine on a stability ball with the ball under your lower back. Knees bent at 90-degrees. Place feet flat on floor with toes shoulder-width a part and pointing straight ahead. Allow back to extend over curve of ball. Cross arms across chest or place hands behind ears or head. Movement: 1. Slowly crunch upper body forward, raising shoulder blades off the ball. 2. Slowly lower upper body over the ball, returning to the start position. 3. Repeat as instructed. 4. To progress, raise arms overhead. Keep chin slightly tucked to take strain off of cervical spine. Repetitions 8 – 12 Sets: 2 to 3 |
[/av_textblock]
[/av_one_half][av_one_half min_height=” vertical_alignment=” space=” custom_margin=” margin=’0px’ padding=’0px’ border=” border_color=” radius=’0px’ background_color=” src=” background_position=’top left’ background_repeat=’no-repeat’ animation=” mobile_display=”]
[av_image src=’https://horshamathletic.com/wp-content/uploads/2016/10/Jewel3.jpg’ attachment=’4683′ attachment_size=’full’ align=’center’ styling=” hover=” link=” target=” caption=” font_size=” appearance=” overlay_opacity=’0.4′ overlay_color=’#000000′ overlay_text_color=’#ffffff’ animation=’no-animation’][/av_image]
[/av_one_half][av_one_half first min_height=” vertical_alignment=” space=” custom_margin=” margin=’0px’ padding=’0px’ border=” border_color=” radius=’0px’ background_color=” src=” background_position=’top left’ background_repeat=’no-repeat’ animation=” mobile_display=”]
[av_image src=’https://horshamathletic.com/wp-content/uploads/2016/10/Jewel4.jpg’ attachment=’4684′ attachment_size=’full’ align=’center’ styling=” hover=” link=” target=” caption=” font_size=” appearance=” overlay_opacity=’0.4′ overlay_color=’#000000′ overlay_text_color=’#ffffff’ animation=’no-animation’][/av_image]
[/av_one_half][av_one_half min_height=” vertical_alignment=” space=” custom_margin=” margin=’0px’ padding=’0px’ border=” border_color=” radius=’0px’ background_color=” src=” background_position=’top left’ background_repeat=’no-repeat’ animation=” mobile_display=”]
[av_textblock size=” font_color=” color=”]
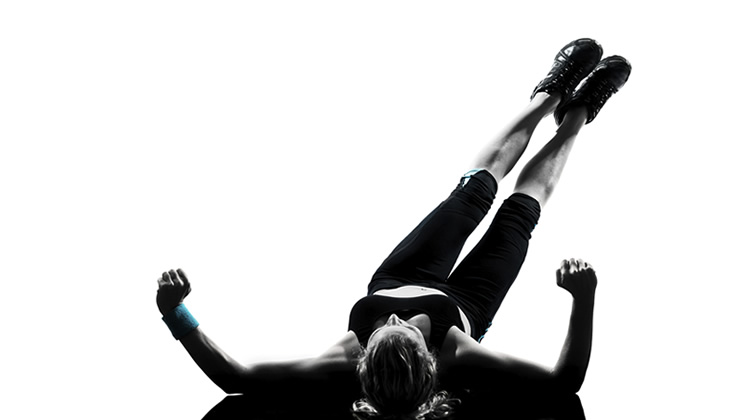
| Reverse Crunch
Preparation: Lie supine on a bench with hips and knees bent at a 90-degree angle, feet in the air, and hands gripping a stable object or placed on the floor by hips. Movement: 1. Lift hips off the floor while bringing the knees towards the chest. 2. Slowly lower the hips back to the start position. 3. Repeat at instructed. Avoid swinging the legs to prevent injury. Repetitions 8 – 12 Sets: 2 to 3 |
[/av_textblock]
[/av_one_half][av_one_full first min_height=” vertical_alignment=” space=” custom_margin=” margin=’0px’ padding=’0px’ border=” border_color=” radius=’0px’ background_color=” src=” background_position=’top left’ background_repeat=’no-repeat’ animation=” mobile_display=”]
[av_heading heading=’Need Help?’ tag=’h3′ style=” size=” subheading_active=” subheading_size=’15’ padding=’10’ color=” custom_font=”][/av_heading]
[av_textblock size=” font_color=” color=”]
Schedule a complimentary session with a Certified Personal Trainer!
[/av_textblock]
[/av_one_full]